
Ingredients
-
Nonstick cooking spray or neutral oil, for greasing the pans
-
1
(8-ounce/227-gram) package pure almond paste (not pastry filling) (see Tip)
-
1 ½
cups/340 grams unsalted butter, at room temperature
-
1
cup/201 grams granulated sugar
-
4
eggs, yolks and whites separated
-
1
teaspoon almond extract
-
2
cups/255 grams all-purpose flour
-
½
teaspoon fine salt
-
Red and green food coloring, preferably gel
-
1
(12-ounce/340-gram) jar apricot or raspberry preserves (not seedless)
-
8
ounces/227 grams semisweet or bittersweet bar chocolate
-
Sprinkles, for finishing (optional)
Preparation
- Arrange 2 racks at the center of the oven and heat to 350 degrees. Make room in your refrigerator for 1 rimmed half baking sheet. Grease 3 (13-by-9-inch) baking pans or quarter sheet pans with cooking spray or a little oil, then line with parchment or wax paper. (This helps the paper stay in place.) Spray or oil the parchment.
- Combine the flour and salt in a medium bowl. In the bowl of a standing mixer (or with a hand mixer), or in a large bowl if using an electric hand mixer, break up the almond paste using a fork or your fingers. Add butter, sugar, egg yolks and almond extract. Using the paddle attachment, beat on high until light and fluffy, about 5 minutes, scraping down the bowl halfway through. Turn off the mixer, add a third of the flour and salt, then beat on medium-low until just combined. Repeat with another third, scraping down the sides of the bowl as needed, and continue until all the flour is added and incorporated. Transfer batter to a large bowl. Rinse and dry the mixing bowl.
- Add egg whites to the mixing bowl and beat on high speed with the whisk attachment until stiff peaks form, about 30 to 45 seconds. Fold the egg whites into the batter until just combined.
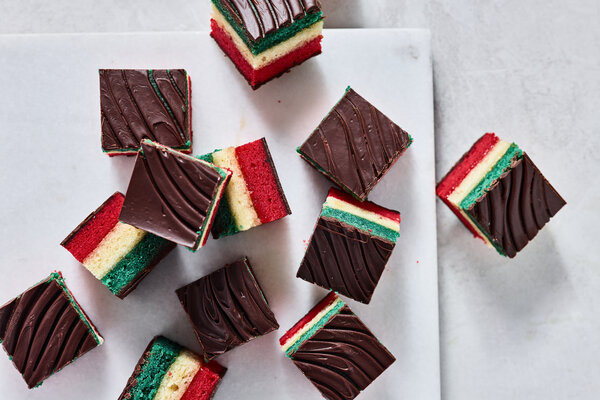
- Remove one-third of the batter to one of the prepared pans. Use an offset spatula to evenly spread the batter in the pan all the way to the edges. (This can get a little tricky, but have patience and take your time. The oil on the pan should help hold the paper in place, but if you’re having trouble, hold the paper in place with one hand while you spread with the other.) Remove another one-third of the batter to a medium bowl and add a couple drops of green food coloring. Stir until blended, and add more to reach your desired shade. Transfer green batter to a prepared pan and spread evenly. Add a couple drops of red food coloring to the remaining batter, stir to combine, add more as needed, then transfer to the last pan and spread evenly. Firmly tap each pan on the countertop to release air bubbles.
- Bake for 10 to 11 minutes, rotating pans halfway through, until the edges are barely browned, the tops are just set, and a toothpick inserted into the center comes out clean. Immediately slide cakes from the pans onto racks using the parchment paper. Cool completely.
- Using the parchment paper, slide the green cake onto a rimmed (18-by-13-inch) half baking sheet. In a small saucepan, heat preserves over medium until loose, then strain through a fine mesh sieve. Spread half of the preserves over the green layer, going all the way to the edge. Carefully flip the uncolored layer on top (use a large offset spatula to help), and remove the parchment paper. Spread with the remaining preserves. Top with the red layer and remove the parchment paper. Cover with plastic wrap and place another rimmed baking sheet on top of the cookies. Transfer to the refrigerator, then top with heavy cans so the weight is evenly distributed. Refrigerate overnight.
- Melt half of the chocolate in a double boiler or in the microwave in 30-second bursts. Using an offset spatula, spread the chocolate on the top and to the edges, then refrigerate until firm, about 30 minutes. Melt the remaining chocolate. Place a piece of parchment or wax paper on a cutting board, then place on top of the cake and invert the cake onto the board. Spread the bottom with the remaining chocolate. Let cool for a few minutes, then use the tines of a fork to draw waves in the chocolate and add sprinkles, if desired. Refrigerate until almost firm, but still slightly soft, about 5 to 10 minutes. (If you wait until the chocolate is fully set, the chocolate will crack when you cut.)
- Run a sharp knife under hot water, dry, then trim the edges and save for snacking. Cut the cake into 1-inch squares, running the knife under hot water and drying between cuts. Return to the refrigerator to set completely. Store in the refrigerator in an airtight container with wax paper between layers. Allow to come to room temperature a bit before serving.


